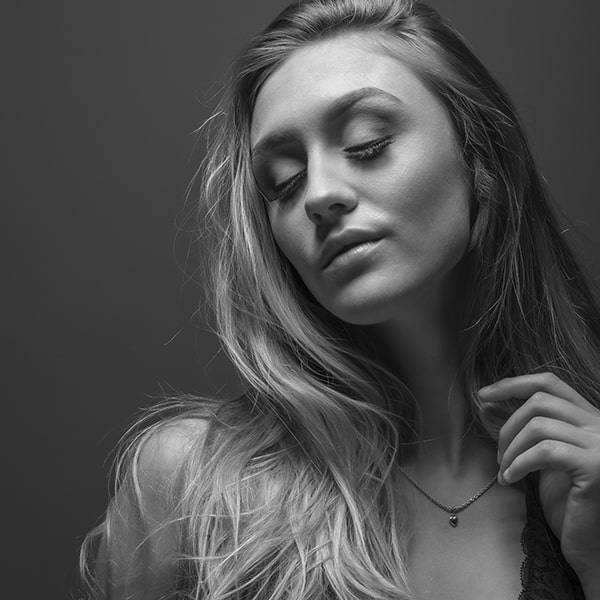
Why do some black and white images look amazing with sharp detail and an amazing tonal range that seems to jump off the screen, while others look murky, dull, flat, and lifeless, sitting there like a lump of clay? I’ve often wondered about this myself but it wasn’t until I stumbled upon something called “micro-contrast” that it all became crystal clear to me.
I took a deep dive down into this “micro-contrast” rabbit hole and emerged with some key findings that, if you’re a lover of truly great black and white photography, you won’t want to miss.
So, how do you make your black and white boudoir images pop? Use a camera that cancels out the effect of the low-pass filter, acquire lenses that enhance micro-contrast, use a strobe or speedlite, and utilize the proper f-stop.
Or…
You could just buy a $9,000 Monochromatic Leica (not including lens) and have at it. But I’m guessing you’re more interested in the cheaper alternative, right?
So below, we’ll go over each of these key ingredients mentioned above and just like Alice, discover some truly amazing and wonderful things in the monochrome Wonderland.
What Is This Micro-Contrast You Speak Of Earthling?
If you’ve read any of my previous articles you’ll know that I love breaking things down and really defining what something is. I see no reason to change that process here and it will help us to see the obvious, or rather, what’s right in front of us in the first place.
Let’s take the term “micro-contrast”… or rather, just the first part of that.
Micro — very small; involving minute quantities or variations
Contrast —degree of difference between the lightest and darkest parts of a picture
If we put these two definitions together we get something along the lines of… minute quantities of degrees between the lightest and darkest parts of a picture. That sounds good, but we could also say:
A range of comparison in minute variations of light and dark tones in an image.
Benefits of Micro-Contrast
Sharper Images
High quality micro-contrast captures a wide range of intermediary tones of an image making that image appear to be sharper. The result is a greater array of tones in an image. This micro-contrast is what makes the image “pop” or seem more alive and looking more real.
Greater Perceptual Depth
Good micro-contrast in an image adds more perceptual depth, adding to the illusion of greater three dimensionality.
Better Low Light Shooting
In low light, micro-contrast brings out more gradation of tonal ranges in the shadows, bringing to life areas that might normally just be black lifeless voids. It also contributes to a greater gradation with skin tones making soft buttery light even softer and more buttery.
How Can You Achieve Micro-Contrast?
There are two main ways to get micro-contrast that together deliver a one-two punch.
The first is using a camera that has no color filter array.
What’s a Color Filter Array?
The color filter array (CFA) is like a thin film that adheres to the sensor and allows specific wavelengths of light to pass through to the sensor. We’re mainly talking about red, green, and blue.
Color filter arrays are used on sensors to aid in creating the color in an image. The problem with them with regard to micro-contrast is that any filter will, by its very nature, also dilute, diminish, and lower the intensity of all light passing through it.
Best Cameras For Black & White Photography
If you’re a true black and white aficionado, you’ll want a camera with no color filter array so there’s no dilution or filtering down of the light. This will, however, restrict you to only capturing black and white images because your camera will be strictly monochromatic (no color images will be possible).
The only problem with a dedicated monochromatic camera is that they are extremely expensive and only one manufacturer makes them (that I’m aware of).
Check out Leica’s M10 Monochrom Rangefinder at around $9,000 (and that’s without any lenses which are just as expensive). This, of course, is the creme de la creme of monochrome cameras (as legend has it), unless Fuji decides to come out with one of their own… but we’ll have to wait and see about that.
A Less Expensive Alternative
A less expensive alternative is to buy a camera that cancels out the effect of the low-pass filter (LPF) in your camera. (Now, many state these cameras have no LPF but in truth they do but the effect is cancelled with special technology.)
A low-pass filter, also known as an anti-aliasing filter, was created by camera manufacturers to handle the problem of the moire` effect in images.
Cameras With No LPF
Cameras like Nikon’s D800e, D810, D850, Z7, and Z50 cancel out the effect of the low pass filter giving your images sharper detail by eliminating the blur from light rays it creates that hit the sensor. This increase in detail allows for more micro-contrast… not to the extent that having no color filter array does, but better than a camera with a low-pass filter.
Sony cameras with an “R” cancel out the effect of the low-pass filter, or in effect, “have no low-pass filter”.
I’m sure there are more. You’ll have to do more research if you’re in the market for one.
The Moire` Effect
The moire` effect is when you have the appearance of rippling or undulating waves when photographing a repetitive pattern of fine lines, dots, or any kind of small symmetrical shape found in fabric, building facades, or on any surface.
An intricate lacy pattern on lingerie could trigger the moire` effect when shooting boudoir.
Cameras with a low-pass filter, for the most part, eliminate this problem but it also causes a loss in detail.
Overcoming The Moire` Effect
Ways to prevent the moire` effect if you have a camera that cancels out the effect of a LPF:
(By the way, you can still get the moire` effect if your camera has a LPF, but not nearly as much as with a camera without one).
Change the angle at which you’re shooting your subject
Change your focus point
Increase your aperture
Remove it in post (this article does not go into this but you can Google it)
Another Way To Improve Micro-Contrast
Images shot using a strobe or speedlite will produce more micro-contrast, so combining that with a camera with no LPF and a lens that enhances micro-contrast will get you closer to resembling black and white images that were shot with a dedicated monochromatic camera with no CFA for much cheaper.
Best Lenses For Micro-Contrast
Not all lenses are created equal and if you’re gearing up to shoot some micro-contrast black and white boudoir images, you’ll want to use a lens that will support that even more. We’ll stick with just 50mm and 35mm focal lengths, adding just one zoom to the bunch.
Nikkor 50mm f/1.4 AIS
Nikkor 50mm f/1.8 AF D
Nikkor 35mm f2 AF D
Nikkor 35mm f/1.4 AIS
Fuji 35mm f/1.4
Fuji 50mm f/2
Vintage Lenses
50mm f/2 AIS
55mm f/1.2 AIS
Nikkor 17-55mm f/2.8 AF S-DX
The Right F/Stop
Adding to that one-two combination of shooting with a camera that has no low-pass filter along with a lens that enhances micro-contrast, you’ll want to shoot at the right f/stop.
According to Lloyd Chambers (who has done thorough testing with micro-contrast) you’ll want to keep your aperture below f8. Anything above that and your micro-contrast starts to decline.
In relation to boudoir, you may need to stop down some from say 2.8 to 5.6 if your subject’s body lies at different focal planes in order to capture more micro-contrast down the length of her body — that is, if you don’t mind trading some depth of field for it.
For example, if she’s stretched out from head to toe and you’re shooting down her body near the top of her head.
Further Info
To read more on this subject, I recommended visiting Lloyd Chambers blog post on this topic entitled, “The Zeiss Pop”. You can also view numerous images with micro-contrast, just make sure you click through to his Flickr examples to see the high-resolution samples.
Another great source on this topic is to check out the YouTube channel Theoria Apophasis. Once on his channel, click on the “Videos” tab, then type in “micro contrast” in the search bar and half a dozen videos will come up.
Enhancing Your Black & White In Post
Now that you’ve done all you can at the business end of your camera with regard to capturing an image with the most micro-contrast, enhancing that image even more in Photoshop is the next step.
Open your image in Camera Raw, then after you’ve made your adjustments with Exposure, Highlights, Shadows, etc., select the “Black & White” button up top under the Basic tab.
Select your HSL Adjustment tab, which will now have changed to read “Black & White Mix”.
Here, you can play with the Orange slider to adjust the skin tone either lighter or darker. The Red slider will affect the lips, but also anything else that’s red in the image. And possibly the Yellow slider as well.
You’ll actually want to fiddle with all the sliders just to see how they affect your image. Some may do nothing at all. It just depends on what colors were captured in the original file.
Then continue on with your normal editing process.
More Helpful Tips For Shooting Black & White Boudoir
Something else you want to be aware of when shooting for black and white is to have your client’s wardrobe contrast nicely with her skin tone. Having lingerie that closely matches skin tones will decrease contrast with everything sort of blending together.
Darker skin tones with lighter apparel and lighter skin tones with darker apparel usually makes for a more dynamic and striking black and white image.
Be careful of wearing pure white though. In some cases it may work but you run the risk of it being too bright and can distract from the subject herself and overpower the entire image.
Along with wardrobe, you’ll also want to take into account the furniture, bedding, and background. Personally, I like to have all three of those elements, skin tone, wardrobe, and setting contrast with one another. This separates all three nicely and balances out the image.
Summary
If you’re interested in creating black and white boudoir images that sizzle with detail and appear to “pop” then remember these key ingredients.
— Make sure your client’s wardrobe, setting, and skin tone contrast nicely with one another
— Use a camera that cancels out the low-pass filter effect (or buy a monochromatic camera if you have that kind of scratch)
— Use a lens that enhances micro-contrast
— Use strobe or flash to increase micro-contrast
— Use Photoshop to adjust tones even more
If you found this article helpful, please forward it to someone else it may also benefit.
Thanks for your time,
Charles Mitri
Founder / Lounge Boudoir
Recent Posts
In this article I’m going to reveal my top 5 tips for boudoir lighting when using flash.And further down I throw in a bonus tip where I’ll explain how to use a flash trigger that’s not...
In this article I’ll reveal how you can learn lighting for boudoir fast.And in bit further down I’ll show some examples with lighting diagrams for a certain kind of look in boudoir. So, stick...